Well I wish I could do this. I already have Sycamore that I could use for the Back & sides & neck material. The tree was about 30 ft from the house so that would definately qualify as local. I bet I could even get some speices for the binding etc. Theres a fair bit of holly around here that would make good bindings. Probably would use poplar for the Kerfing. My biggest problem would be finding something suitable for the topwood & braces.
Earlier this year whilst walking along the beach, it crossed my mind to try using some type of shell for a rosette and thats about 70 miles from here.
Now I will reearch something for the top.
Garry
Grant's Back Yard Build
- Garry Hallam
- Posts: 1062
- Joined: Sun Aug 24, 2008 1:38 pm
- Include Off Topic: Yes
- Location: Saddleworth,England
Re: My "Back Yard" build
Silly rule golden words make, practice practice makes perfect,
Perfect is a fault, and fault lines change - Michael Stipe
Perfect is a fault, and fault lines change - Michael Stipe
- Eben
- Chairman Emeritus
- Posts: 6152
- Joined: Thu Aug 21, 2008 9:58 am
- Include Off Topic: Yes
- Location: Lummi Bay, WA
- Contact:
Re: My "Back Yard" build
Ok, the new forum for these builds is up - So if you're in, go there and tell me so and we'll start your thread!
Garry - You got TWO categories;
All local wood and/or wood that does/would naturally grow within 100 miles of your shop, OR,
a scrounge build made with whatever, so long as it started life as something else -
I know you can find a combination that will work!
E
Garry - You got TWO categories;
All local wood and/or wood that does/would naturally grow within 100 miles of your shop, OR,
a scrounge build made with whatever, so long as it started life as something else -
I know you can find a combination that will work!
E
- Ventura Bill
- Posts: 226
- Joined: Mon Aug 25, 2008 12:08 am
- Include Off Topic: Yes
- Location: Ventura, CA USA
Re: Grant's Back Yard Build
I sort of like this idea though here in Southern California, I wonder about cutting someone's Orange or Avocado tree for tonewood.  It does lead to some ideas though about scrounging materials where one can find them. There are Cypress and Eucalyptus trees around but not sure how they might work. Most of the better woods do seem to be located further north in the state. I would be interested to see what others in this region might find useful so I will keep an eye on what people use to build.
Bill
Bill
Ventura Bill
If it ain't broke, don't fix it. Doesn't fit? Get a bigger hammer.
If it ain't broke, don't fix it. Doesn't fit? Get a bigger hammer.
- BaldEagle55
- Posts: 473
- Joined: Sat Aug 23, 2008 6:56 pm
- Include Off Topic: Yes
- Location: Thunder Bay, Ontario, Canada
Re: Grant's Back Yard Build
Grant,
Way cool, I love the black spruce concept as there may be some here in Thunder Bay (just north of Minnesota). I am interested to have you tell us how it sounds. I started my guitar under the tutledge of a fellow from the Gun Flint Trail who uses poplar a lot for his guitar bodies as well as other native woods to northern Minnesota.
Here is a link to his website http://www.hjo.com/seatonguitars/wood.html" onclick="window.open(this.href);return false; .
All the best Grant!!!
Tom
- Glenn
- Posts: 471
- Joined: Sat Aug 23, 2008 6:00 pm
- Include Off Topic: Yes
- Location: By the beautiful Chesapeake Bay!
- Contact:
Re: Grant's Back Yard Build
Wow! Those Seaton guitars are gorgeous...I'd love to get my hands on some of the woods he uses...
Glenn
Glenn
Glenn Bosshard
http://www.hulamonkey.com" onclick="window.open(this.href);return false; - Hand built ukuleles
http://www.planetserenity.com" onclick="window.open(this.href);return false; - Products to Nourish the Soul
My religion consists of a humble admiration of the illimitable superior spirit who reveals himself in the slight details we are able to perceive with our frail and feeble mind. A. Einstein
- whitespruce
- Site Admin
- Posts: 4367
- Joined: Thu Aug 21, 2008 6:53 am
- Include Off Topic: Yes
- Location: Northern Minnesota, USA
Re: Grant's Back Yard Build
Ya, and you notice he uses a lot of white spruce topsGlenn wrote:Wow! Those Seaton guitars are gorgeous...I'd love to get my hands on some of the woods he uses...
Glenn
And did you see he uses a lot of white spruce tops
G
- Glenn
- Posts: 471
- Joined: Sat Aug 23, 2008 6:00 pm
- Include Off Topic: Yes
- Location: By the beautiful Chesapeake Bay!
- Contact:
Re: Grant's Back Yard Build
I'm thinking you noticed that he uses a lot of white spruce tops... 
Glenn
Glenn
Glenn Bosshard
http://www.hulamonkey.com" onclick="window.open(this.href);return false; - Hand built ukuleles
http://www.planetserenity.com" onclick="window.open(this.href);return false; - Products to Nourish the Soul
My religion consists of a humble admiration of the illimitable superior spirit who reveals himself in the slight details we are able to perceive with our frail and feeble mind. A. Einstein
http://www.hulamonkey.com" onclick="window.open(this.href);return false; - Hand built ukuleles
http://www.planetserenity.com" onclick="window.open(this.href);return false; - Products to Nourish the Soul
My religion consists of a humble admiration of the illimitable superior spirit who reveals himself in the slight details we are able to perceive with our frail and feeble mind. A. Einstein
- whitespruce
- Site Admin
- Posts: 4367
- Joined: Thu Aug 21, 2008 6:53 am
- Include Off Topic: Yes
- Location: Northern Minnesota, USA
Re: Grant's Back Yard Build
OK, I went through the files on both computers and found what photos I had that have not been posted, so I will post these first before I add the ones I took this afternoon.
We left off with the top braced and were going to move on to the neck. I made the neck by gluing up 2 outer pieces of birch, which came from slabwood in my firewood pile, with a center layer of 1/4" maple flanked by 2 1/8" laminations of butternut. All of this wood was local.
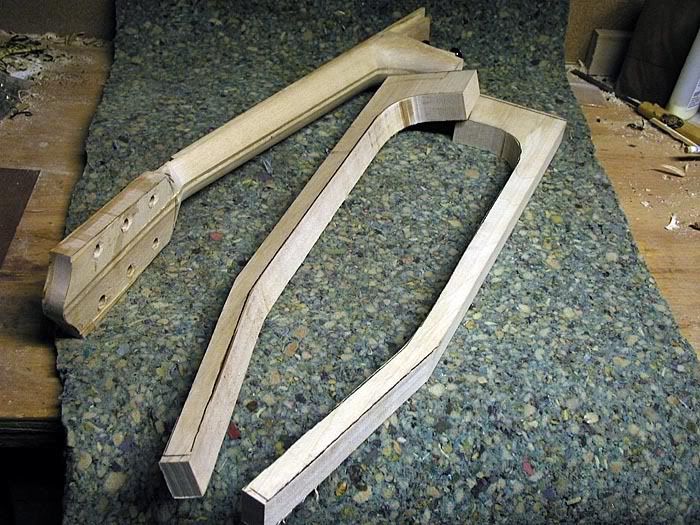
Here is one neck glued up and pieces for another.
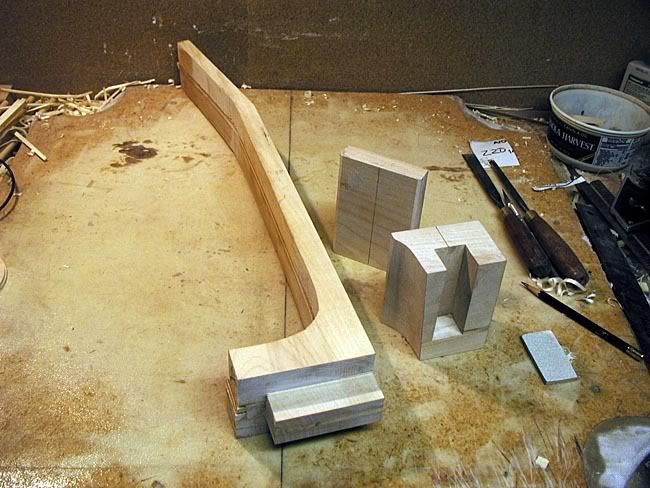
The neck block and tail block were carved from basswood. Here they are with the glued up neck
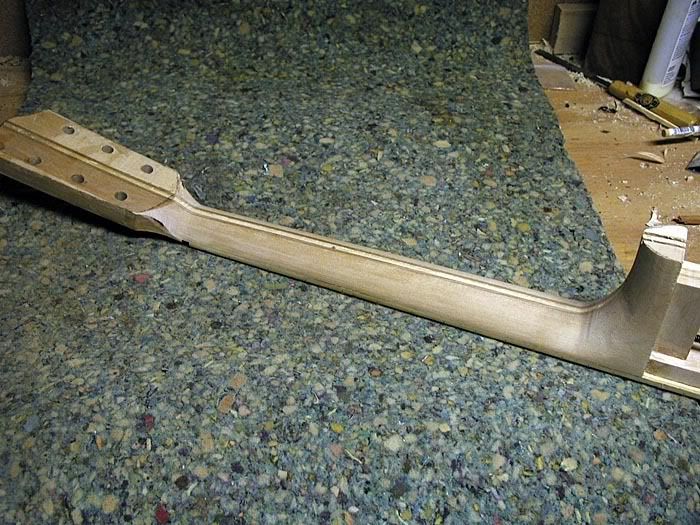
The neck glued up and rough carved, tuner holes drilled. Fingerboard extension and fingerboard glued on
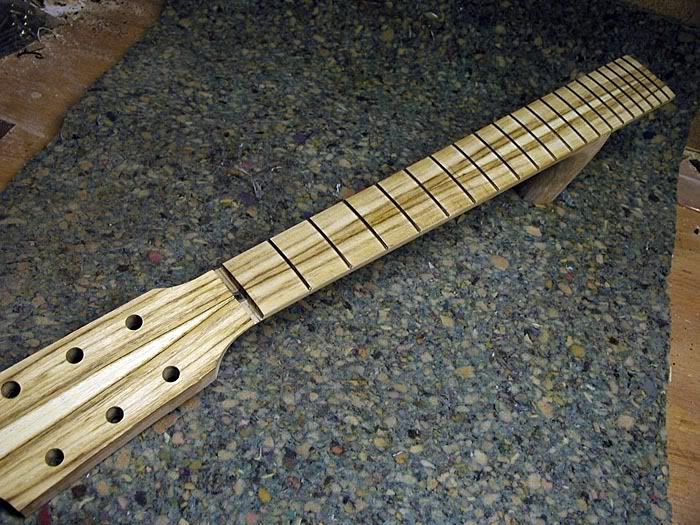
I made the fingerboard from black locust that was growing near our garden. After quartersawing, the wood was too narrow for a 1-piece fingerboard, so I bookmatched 2 pieces. I did the same for the peghead overlay.
Here is the fingerboard on and fretted.
I could not find any photos of bending the sides. One thing that did happen during bending is that the cutaway creased a bit in 2 places. I should have bent another side, but I forged ahead with the bad side. I am still fighting that mess
So, my proceedure is to assemble on a building board with the next step being to glue the blocks to the top and then glue the kerfed linings to the sides. I could not find photos of that either, so the next photo is gluing the sides to the top and end blocks
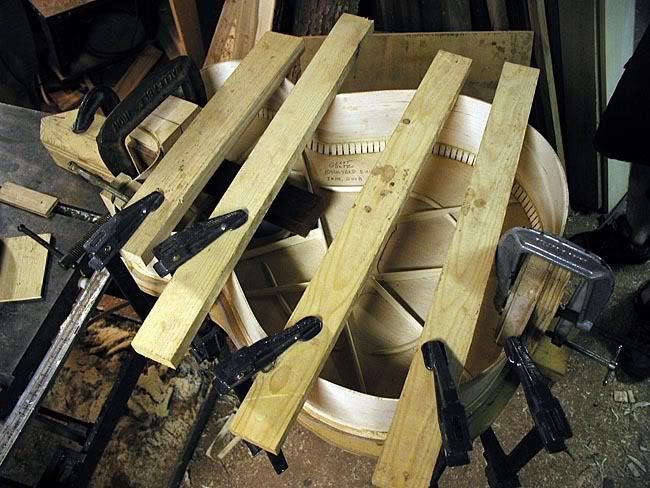
I basically follow the procedure outlined in Cumpiano's book
Next I braced the back. I used my double "X" back bracing laminated up from spruce strips just like the top braces
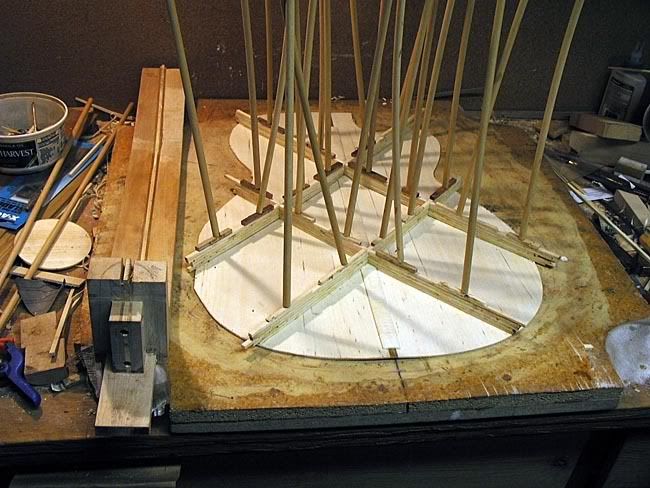
Here is the braced back...
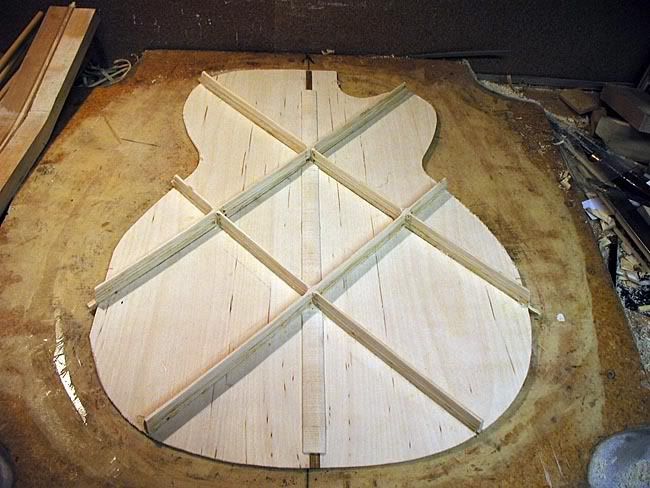
...and with the braces carved ready to glue onto the box
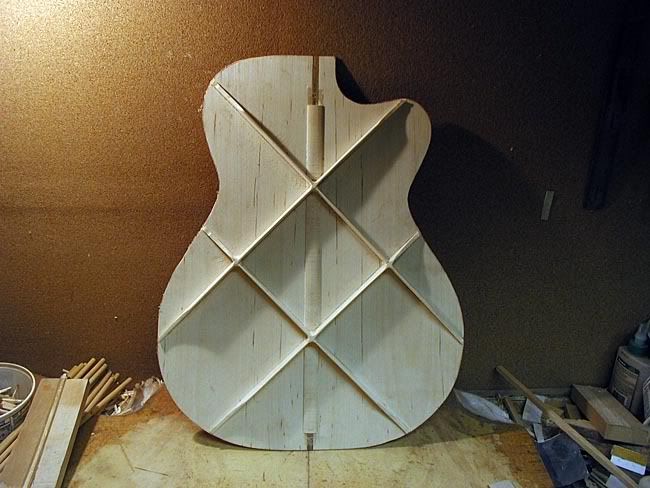
Next, I cut the sides down to profile and sanded with the radius dish
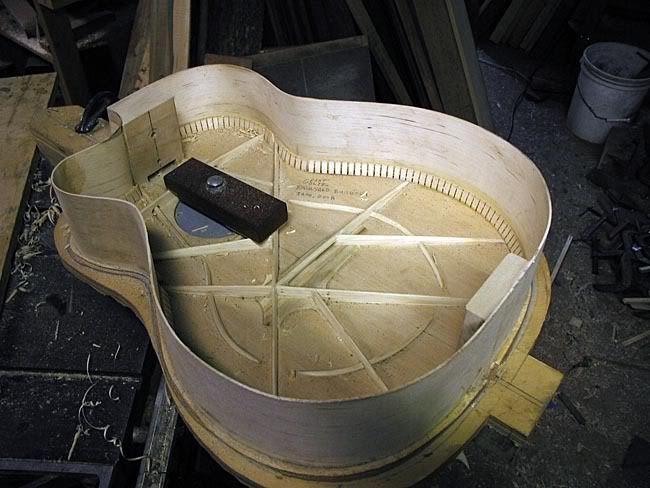
Then I glued in the kerfed linings for the back
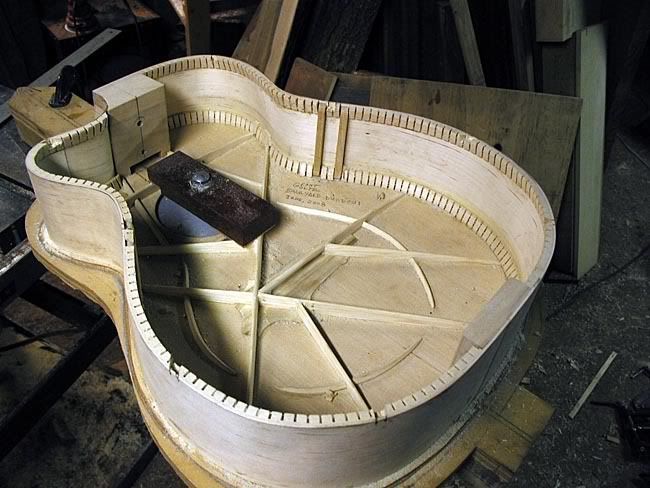
And sanded again with the radius dish. Note that I have added some side braces
I don't have photos of gluing on the back, but I rope it on with a long strip of inner tube rubber cut about an inch wide.
After trimming the top and back flush with the sides, it is time to cut the binding and purfling channels. I don't use any fancy fixture, just a router bit with a bearing and freehand it with my trim router. It works fine for me and is fast. Againj, no photos of this.
For bindings, I am using sumac. Top purflings are butternut and maple and no back purflings. End graft is the same
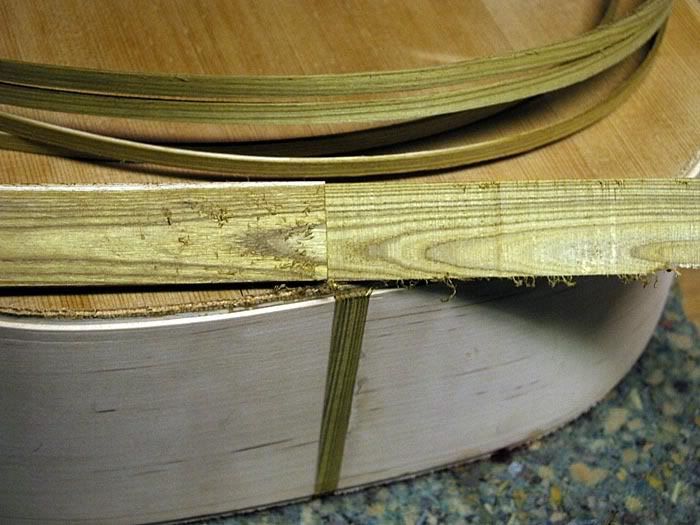
So, that is where I left off back last year. I did a bit of work before the stringfest, but just glued the bindings on about a month ago. I will pick up the latest progress in the next post.
G
We left off with the top braced and were going to move on to the neck. I made the neck by gluing up 2 outer pieces of birch, which came from slabwood in my firewood pile, with a center layer of 1/4" maple flanked by 2 1/8" laminations of butternut. All of this wood was local.

Here is one neck glued up and pieces for another.
The neck block and tail block were carved from basswood. Here they are with the glued up neck

The neck glued up and rough carved, tuner holes drilled. Fingerboard extension and fingerboard glued on

I made the fingerboard from black locust that was growing near our garden. After quartersawing, the wood was too narrow for a 1-piece fingerboard, so I bookmatched 2 pieces. I did the same for the peghead overlay.
Here is the fingerboard on and fretted.

I could not find any photos of bending the sides. One thing that did happen during bending is that the cutaway creased a bit in 2 places. I should have bent another side, but I forged ahead with the bad side. I am still fighting that mess
So, my proceedure is to assemble on a building board with the next step being to glue the blocks to the top and then glue the kerfed linings to the sides. I could not find photos of that either, so the next photo is gluing the sides to the top and end blocks

I basically follow the procedure outlined in Cumpiano's book
Next I braced the back. I used my double "X" back bracing laminated up from spruce strips just like the top braces

Here is the braced back...

...and with the braces carved ready to glue onto the box

Next, I cut the sides down to profile and sanded with the radius dish

Then I glued in the kerfed linings for the back

And sanded again with the radius dish. Note that I have added some side braces
I don't have photos of gluing on the back, but I rope it on with a long strip of inner tube rubber cut about an inch wide.
After trimming the top and back flush with the sides, it is time to cut the binding and purfling channels. I don't use any fancy fixture, just a router bit with a bearing and freehand it with my trim router. It works fine for me and is fast. Againj, no photos of this.
For bindings, I am using sumac. Top purflings are butternut and maple and no back purflings. End graft is the same

So, that is where I left off back last year. I did a bit of work before the stringfest, but just glued the bindings on about a month ago. I will pick up the latest progress in the next post.
G
